Rocking a great sound is even more important than a great video.
Audio can make and break your video. People will tolerate some poor quality video, but they’ll go nuts over the audio and before you know it, you’ll have comment nightmares of would-be experts criticizing everything you use from your mic to your codec.
In this short guide, we’ll discuss not only how to get the best audio quality, but also what all the acronyms and numbers mean that you’ll run across in doing your research on this. This is not intended to be a one stop guide, but rather to open the doors on how to go about further reading on the topic. Audio engineering isn’t a simple subject, if it were you wouldn’t be searching on Google and reading this blog for the answer, after all, you’d just be doing it right.
How to get the best audio on your project
Loudness and volume are difficult things to measure. How we experience them greatly varies from person to person and greatly dependent upon the surrounding environment. There can be such a contrast that measuring only the signal strength can be greatly misleading. But when you’re creating a vlog or podcast, you need to be sure that it’s perceived loud enough against other podcasts or tracks.
There’s nothing more jarring for a viewer or listener than having to turn up (or down) the volume on each thing they listen to. People want a consistent volume, and if people haven’t engineered their tracks to match what they expect from others, then it can cause a negative experience.
The Loudness Wars
There was a time when the streaming services weren’t paying attention to sound. This is now known as the Loudness Wars, from the late 90s and early 00s. Music producers and advertisers were eager to make their sounds louder than everyone else’s, so that they’d capture your attention more successfully.
Finally, YouTube and other services realized the negative impact this was happening, and started clamping down on it through a process called normalization (see the glossary below).
Controlling your loudness
In this article, we’ll discuss what all these crazy audio engineering terms mean and how you need to know them in order to get your loudness right.
There are two main categories when discussing sound quality: recording and processing. Recording meaning the equipment you use, and processing meaning what your computer does. In the scope of this article, we’ll discuss the processing side. For the equipment side, take a look at our article on But before we get to that, I’ll handle a few key vocabulary you’ll need to know. If you already know it, scroll down to the next section.
Some things to consider: You can only playback audio at the quality of your audio playback equipment. You might have the highest quality FLAC files pumping into your speakers, but if they’re little one-inch cans you bought at the dollar store, it’s still going to sound bad. Likewise, if your speakers can reproduce the great, near lossless sounds of a CD – and if that’s what you’re going for – you don’t need files of better quality which will take up half your hard drive. Also keep in mind: At the higher definitions of quality, there’s still a great debate on what the untrained human ear can even hear, so it’s questionable of how much hard drive space you need to lose for great audio.
Additionally, you want to provide the best you can into the system from the moment of recording, since the quality can’t be drastically improved during processing. The best thing you can do for quality is to improve your situation at the source. It’s mostly downhill from there. Mastering the audio should be more about maintaining audio levels than fixing bad quality recordings.

Audio vocab 101
- Bits – Audio data is digital data and thus, converts to bits. Think of audio bits as you would pixels on your screen. The more pixels, the clearer and truer the picture, right? Same goes with bits. There are some exceptions, but this mostly true. CD quality is usually at 16-bit, where what is considered “high definition” goes above that, usually at 24 or 32. LoFi producers and projects might intentionally downgrade to make it sound more low tech, but you probably won’t find this so much in video production.
- Bitrate – The rate of movement of those bits, measured in kilobits per second (Kb/s or Kbps). Generally speaking, the higher the bitrate, the better. CDs are at a smooth 1,411 Kbps while MP3s can be from 96 to 320 Kbps. Streaming services will often downgrade the Kbps so that it can maintain quality while being streamed.
- Codec – A program that compresses a file so that it doesn’t take up so much space. Different readers prefer an audio file to be shrunk with different codecs. YouTube prefers the H.264 codec.
- dBFS – DeciBels relative to Full Scale. Measures the peaks over an entire project. The loudest a system can provide before clipping is 0 dBFS, which is why we measure everything from there in negatives. The lower it gets, the further away from clipping (i.e. softer, quieter) it gets.
- dBTP – DeciBels True Peak. Instead of measuring the peaks throughout an entire project, True Peak measures the decibels the momentary peaks of a signal.
- Decibels – A decibel is a relative measurement, how load is one sound or level compared to another. Sounds is a bit of an annoying thing to measure.
- LUFS – Loudness Units relative to Full Scale. We use this to measure the perception of sound over the time of the full production, whether it’s a movie, vlog, or podcast. You might see “LU” sometimes, which is just “loudness units”. It also measures between the highest peak and the lowest point, but not over the full track. Spotify and Apple both use LUFS to measure audio.
- Sample rate – The rate at which samples are taken during a recording. At lower rates, you might here the gaps or it would sound choppy. At higher rates, it would come out smooth. Think of this akin to your refresh rate on a computer screen. CDs are generally at 44.1 kHz, which translates to audio sampled at a rate of 44,100 times per second. Probably you don’t need higher than a CD, but it might be a good idea to give you room for any loss of quality further down the line.
Optimizing Your Export for YouTube
First thing’s first: Don’t discount sound quality. If you have to make compromises on your quality of sound versus video, it’s better to choose having good sound. People will tolerate bad video, but they won’t bad sound.
Compression
Compression lowers the peak sounds and raises the quiet sounds. It helps keep from getting sudden spikes of noise that can be out of context to your production. It is generally a good idea to add a light compression to a file, but nothing too heavy or your file turns into an audio sausage.
Read more about compression on our article covering using it and SmartSound’s audio ducking feature to balance vocals and background music.
Normalization
Normalization also helps, which brings your peak level up to a certain dBFS. If it’s NOT a music video, then normalize your project to as close to 0 as possible (for example, -1). The reasoning here is that during the Loudness Wars, YouTube decided to start normalizing the sound of music videos to -9 dBFS. However, this didn’t apply to everything else, like vlogs, which are still maxed out on volume. If you don’t want your video to sound relatively quiet, then you’ll have to normalize it after compression to sound louder.
In general, it’s best to use a Digital Audio Workstation for your sounds and line it up to your video from there. SmartSound offers our own kind of DAW to use to line up your sound effects and soundtrack appropriately.
This isn’t an issue for podcasters, obviously, but can be an additional hassle for YouTubers/vloggers. It’s easy to find normalization controls on a DAW, though they’re all a bit different and are usually found on export. For using sound clips in your video project, if you don’t want to work with a DAW then use sound clips that are already normalized (like our music and effects). Or normalize them using something like Adobe Audition (I’ll cover that process in a future blog). That said, there are a couple of tricks with DaVinci and Premiere to know.
DaVinci
In Blackmagic’s DaVinci, you’ll have to do normalization on per clip basis. Simply right click on the audio clip and click “normalize”. Then select which standard or “mode” you want to use. The one I typically follow – as well as my colleagues – is EBU R128, which sets the peak at -1.0 dBTP and loudness at -23 LKFS (which is an older term for LUFS). This is simply the European standard to work off of, but if you’re looking at publishing on various streaming platforms, you might want to adjust to their specific settings using the chart below. Using the ITU-R BS.1770-4 mode, you’ll be able to manually adjust the dBTP and LUFS.
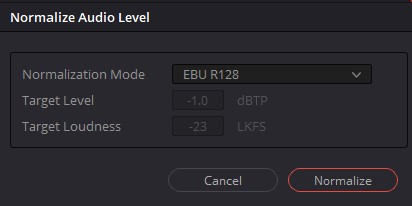
Normalization menu in Black Magic’s DaVinci
Premiere Pro
With Adobe Premiere, it’s pretty much the same. Highlight one or many clips, right click on them, select “audio gain” to normalize the True Peak value. You can use the main export option to adjust the LUFS. In the export window, click on the “Effects” tab, then to the “Loudness Normalization” option. They have a large selection of presets, and if you want to set your own, select the ITU BS.1770-3 option. Then follow the settings in the chart below depending on what you’re optimizing for.
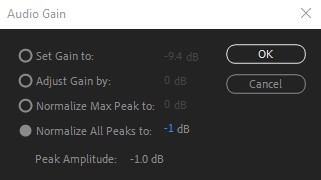
Normalization in Adobe Premiere Pro
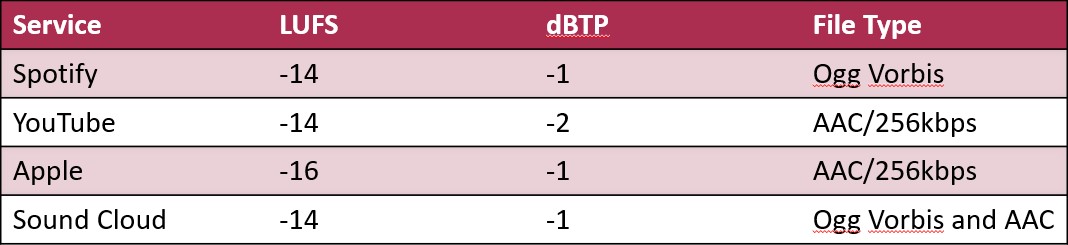
Chart showing popular vlog/podcasting services and what LUFS, dBTP and codecs they use
Codecs
YouTube will manage your file and change it to the formats they need to operate. So it’s best to do that for them to make sure you don’t lose any additional quality than necessary. Use the H.264 codec, as that’s what YouTube prefers, and at the highest quality level you can.
File Type
Most video editors don’t really give you the option of which kind of file type will be embedded with your video. The default tends to be AAC. It’s best to know the differences between each one that’s in modern use though. The general rule is that you want to start with the best file you can, and then work it down from there.
- MP3 – Ancient technology nobody likes anymore. Small files, but lossy. Was good when people had machines that only had 100 megs of hard drive space.
- WAV – The main standard for lossless audio. The most accurate representation of the sound, but also takes up the most room.
- FLAC – Free Lossless Audio Codec. High resolution and lossless. It’s comparable to the quality of a wav and only takes up half the space. The only problem is that Apple systems can’t use it.
- AAC – Advanced Audio Coding. A bit better than mp3. It was standardized by ISO and IEC and is a part of the MPEG-2 and MPEG-4 specifications (audio for use with video). Apple was the first to use it as an audio-only format.
- AIFF – High resolution and what Apple uses instead of wav files.
- Ogg Vorbis – Not high resolution, lossy and open source.
In general, don’t stress the normalization process too much. If you’re just mastering to one service, stick to the levels of that service. If not, then you can master to a standard like -14 LUFS and -1 dBFS or dBTP without losing any quality, even if another service will adjust it by one or two LUFS.