The perfect video needs perfect audio. Check out these top tips to keep it great.
You’ve got your video perfected. It sounds great when you play it in your editor. You’ve got your top-notch soundtrack from Smartsound Cloud, lined up to all the right parts and transitions of your video. The dialogue matches the lip movement, the effect sounds match the effect videos.
It’s ready to render.
You wait the 10 or 20 minutes. And when you render it out, press play, in comes the pops, cracks and whistles. The dialogue is more drowned out than in a Christopher Nolan film and the transition effects are going to blow your speakers!
I sat down with Felix Moebius, Motion Designer at Smartsound, and asked him what he’d do to prevent any audio oddities from happening before locking up his computer in the rendering process.
Lucky for you, there are some easy tips to solve these issues. Audio is a large and complex field, so this is by no means exhaustive, but if you get in the habit of checking for these things it will save you a lot of aches and pains. Also keep in mind that these are the simpler answers. In future blogs I’ll break some of these down into further complexity.
6 things you can do for better audio in your video
File Format
This is the first thing you should check every time you insert an audio file into your video editor. In general, you want an uncompressed file format, like one ending with a .wav, .aiff, or .flac. The absolute worse to use are anything ending with .mp3, .ogg, or .aac. These last three are compressed file formats.
“When you export the video later,” Felix says, “it will probably be compressed anyway, so you can avoid compressing it multiple times. The less audio is compressed, the higher the quality in the final video.”
A general rule: Regarding audio or video quality, you can only start off with something high quality and go down from there. You can never put something in with a low quality and improve it. Unless of course you’re using a very advanced AI or want to spend hours and hours, or perhaps days and days, of advanced editing work.
Audio Ducking
One of the first things to check is to see if your dialogue is coming through. It’s normal to think that if you can’t hear the dialogue over the music, you should turn up the dialogue. This is opposite of the right thing to do. You should actually turn down the background music.
There are two ways to do this. One way is to use a compressor and the other is to use the Smartsound editor. If you have a lot of dialogue, then I’d recommend using the compressor and following the instructions on a previous blog. If you have only a few parts of dialogue that don’t sound clear, then it’s easier to go into the Smartsound editor and make a few adjustments.
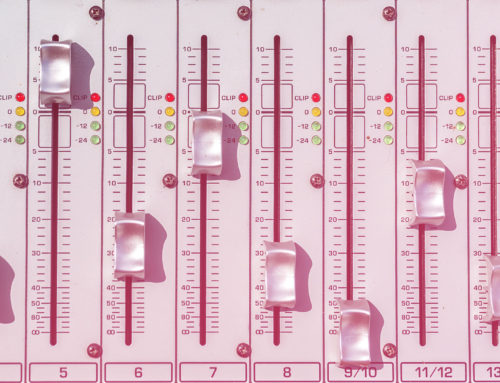
Click on the “Automation Mode” button – the one highlighted in blue in the picture below. This turns on the track automation. Look at the object with the music. A yellow line should have appeared, like in the pic. If you click twice on the yellow line, it will create a node (clicking twice on the node makes it go away). The node changes the volume according to where the line goes.
[insert automation picture]
When you change automation, make sure that you fade it just slow enough to not really notice the music is getting softer. Or if there’s a cut scene, then you can do a more drastic change and people won’t notice anything unnatural.
Check for clipping
Clipping is a very easy thing to watch for. It normally happens when either an audio file is too loud, or sounds haven’t been crossfaded appropriately. You’ll see the volume meter turn red, perhaps a light goes off, and you’ll hear something like a “pfft” instead of what you wanted to hear.
Play your video in the editor, now on the screen with the audio mixer. Look for the track that is causing the red line.
Assuming that the audio was okay from the start, then the first thing you can do is lower the volume on that track. If you turn it down to below the clipping point, but now you can’t hear it relative to the other sounds, then you have two options:
- Turn down all the other sounds until they’re all relative to what you want. Then turn up the master fader (a process called “gain staging”).
- Use a tool like BOOM Library’s Uberloud.
Once you’ve adjusted it, look back to the Master fader and see if there’s any clipping. No? Bravo, you’re done here. Yes? Then you need to look back at your tracks and see which is the culprit now. Sometimes it’s more than one track that is causing the clipping.
This is the short and sweet way. A better way is to do a full “gain staging”, which I’ll get to in a future blog. Sign up for the newsletter here to be alerted to that and other future articles.
Crossfades
If you have a lot of little sound bits that you’ve cut off in random parts, then this might be a cause of clipping. You can get a click or a thwip whenever a sound wave is cut off at a part that’s not at 0. This is easy to fix.
Wherever you hear a click, look to see what tracks might be causing it. When you’ve found the culprit, do a short little fade out or fade in, using the Automation tool that I mentioned under “Audio Ducking”. Of course, if you’re using a video editor outside of Smartsound Cloud, you’ll have to figure out the volume automation controls there.
Headroom
Headroom refers to the space between your loudest audio peak and the distortion ceiling. That is, whenever the audio starts to clip and distort.
As we know from above, you can get clipping from several reasons. “Audio compression when exporting your video may cause clipping in your audio file if the peaks in your waveform are around the 0db range,” Felix says. “To make sure that this does not happen, I’d recommend a headroom of about -1 db.”
Look to your Master fader and make sure nothing goes above -1 db. It’s actually an even better measure than just looking for red lines.
Loudness
It’s no easy thing to measure how loud audio is. There are many terms, many measures. Loudness generally refers to how loud the audio is perceived. Audio platforms have developed a fairly universal way of understanding loudness in a digital sense, and for that we use the term Loudness Units, Full Scale (LUFS).
Each video and audio platform on the Internet prefers a different LUFS level. YouTube’s preferred level is at -14 LUFS. “Anything louder is automatically turned down by YouTube,” Felix warns. “And anything that is quieter will not be made louder.” This process of turning your LUFS down, too, may not be in the most beneficial process for your audio.
Felix’s advice? If you’re planning on posting to YouTube, “Your audio should at least reach the playback reference level of -14 LUFS. You can easily check the loudness of your audio with the free Analyzer tool at Loudness Penalty from MeterPlugs and Chris Graham.”
Conclusion
Those are 6 easy quick checks and fixes you can do before rendering out your video to ensure that 9 times out of 10, your video is going to sound as good as it looks. Keep creating!