Reaper is one of the more common budget DAWs to use for podcasts, but it can have a steep learning curve. This tutorial will help you set it up to make it easy every time.
Introducing the Digital Audio Workstation
Podcasts can easily be done with just a recorder, but then you’ll never get it to sound like a professional setup. That’s because every pro uses a Digital Audio Workstation (DAW) in order to clean up the sound. People naturally mess up on tongue twisters, erms, ums, plubs, and thabbernacles – anything that ties up your tongue or your brain and leads you to saying the wrong thing. Instead of going back to do the whole thing over, you can just edit it out later. Ideally for podcasting, you’ll want to set it up so that everything can be done live and you can have as polished a product as possible just after recording (and then edit out what you need to later).
In the previous blog, I advised you on various free and/or low cost DAWs to use for podcasts. On this one, I’ll show you how to set up a good podcast recording session on Reaper. I’ve chosen Reaper here because unlike the other ones that I’ve listed, it doesn’t have a preset you can use to jump straight into podcasting. With this guide though, we’ll create a template so you can use and go back to every time for a perfect podcasting session.
That doesn’t mean it’s not hard, though Reaper does have a slight learning curve. However, just follow these steps and we’ll make it easy for you. Generally, you want a track for music and sound effects, and then a track for your speech and your guest’s speech. You can add a plugin as well to help smooth out your voice, but this isn’t necessary. We’ll get into what plugins are best for podcasting in a future blog.
What you’ll need:
- Computer
- Audio interface with at least two mic inputs
- MIDI keyboard (optional if you want sound effects)
- Reaper (get Reaper here)
New Project
The first thing you’ll want to do is start a new project. This is normally automatic when you open Reaper, but if not, click on “File” and then “New Project”.
Setup mics
Make sure your interface is plugged in and is read by Reaper. Go to “Options”, “Preferences” and click on “Device” under “Audio”. Where it says “Audio System”, you can check ASIO or WaveOut. I’ve found (and others have too), that WaveOut is the more stable option.
WaveOut
If you use WaveOut, look under “Input device” and “Output device” and make sure those have the correct devices listed. Usually it will list your interface if you’re using one.
ASIO
If you’re using ASIO, then make sure that the ASIO Driver reads “ASIO4ALL” and you have “Enable inputs” checked. Under both “Enable Inputs” and “Output Range”, make sure the inputs (mics) and outputs (speakers) that you’re using match.
There are of course exceptions to these two setups, but for 99 percent of beginners, these options will work fine.
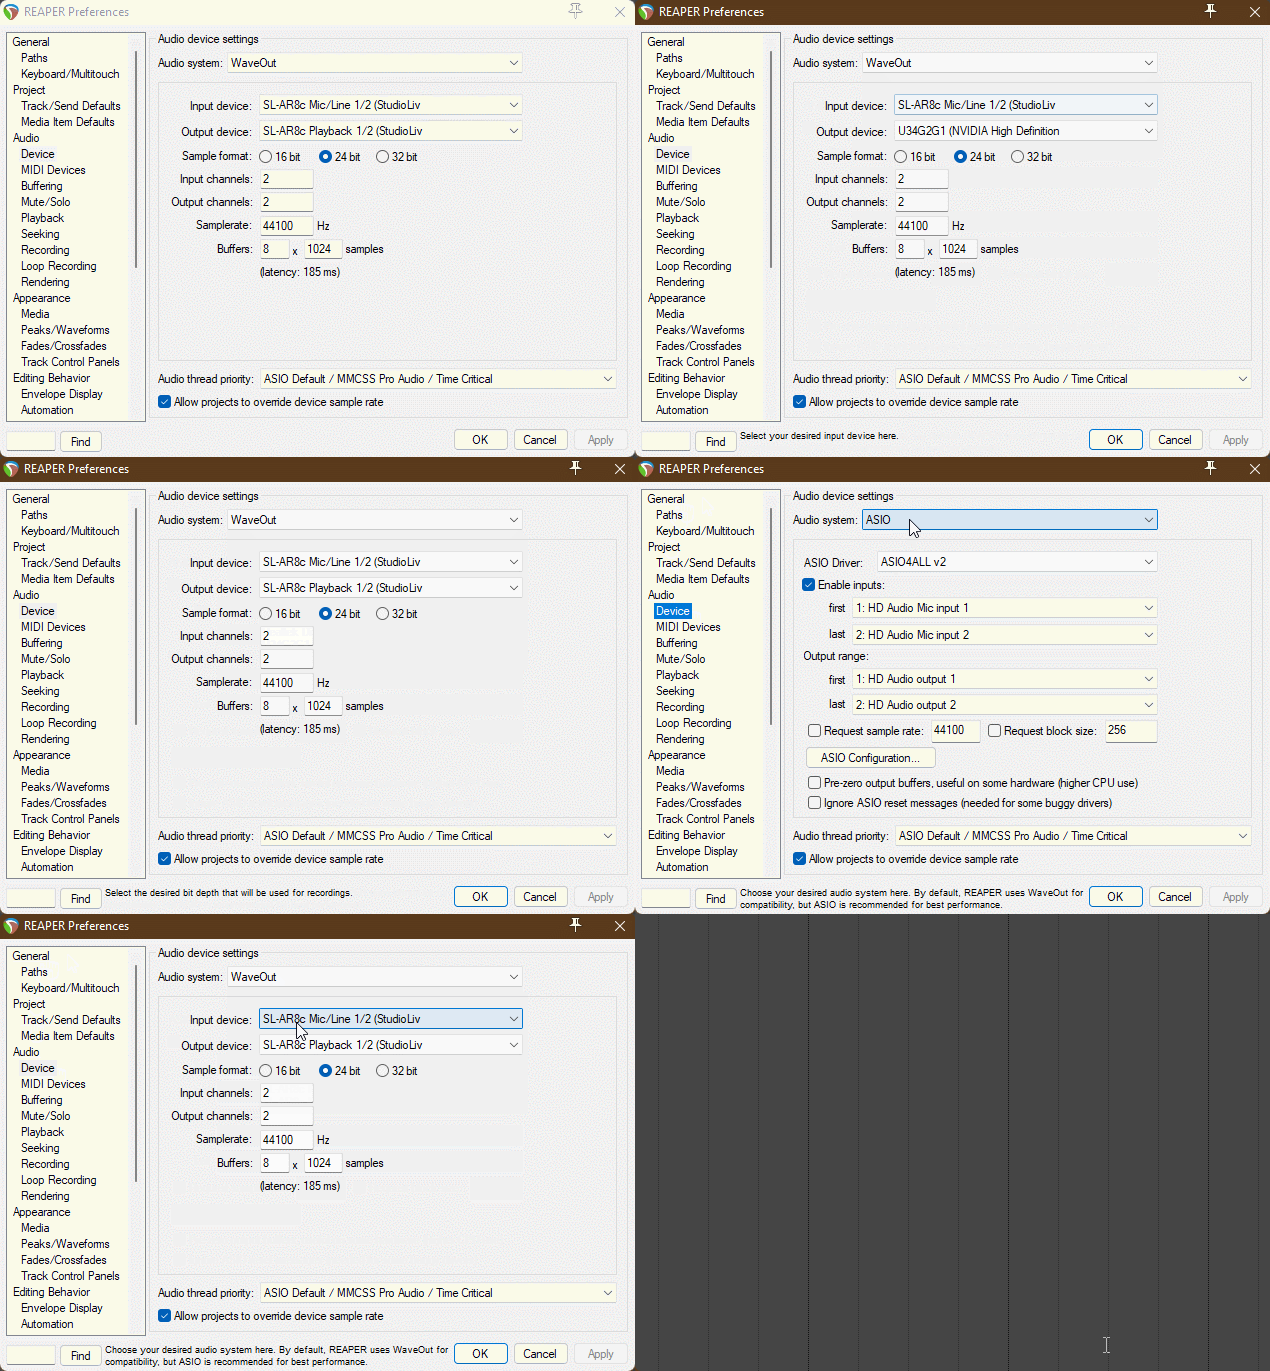
Setting up audio in Reaper
The next thing you’ll want to do is to add a track. Simply right click on an open space on the left, and click “Insert new track”. If it’s just you speaking, you’ll only need one track. If you have a guest or sound effects, you’ll want to add one or two more tracks.

Now we want to connect your mic to the track. You want to be sure to be recording in “mono” because then you’ll hear your voice out of both speakers. If you click on stereo, you’ll only hear your voice out of the left or right speaker. Back in the main window, right click in an empty space on the left. Select “Insert new track” or CTRL+t. Name the track “Mic 1”. Click on the red button to the left. Click on the box below the name, next to where it says “IN FX”. Go to “Input:Mono” then “left” if your mic is on Track 1.
Now, as long as you have pressed the dark red button and it’s lit up, the recording is “armed” and you should be able to hear your voice. Arming it means that when you click the master record, this track will record. You can arm all your tracks at once, or one at a time, however you feel is necessary.
For your podcast guest’s mic, do the same for a second track. Instead of “Input:Mono” and then “left” though, you’ll select “right”.
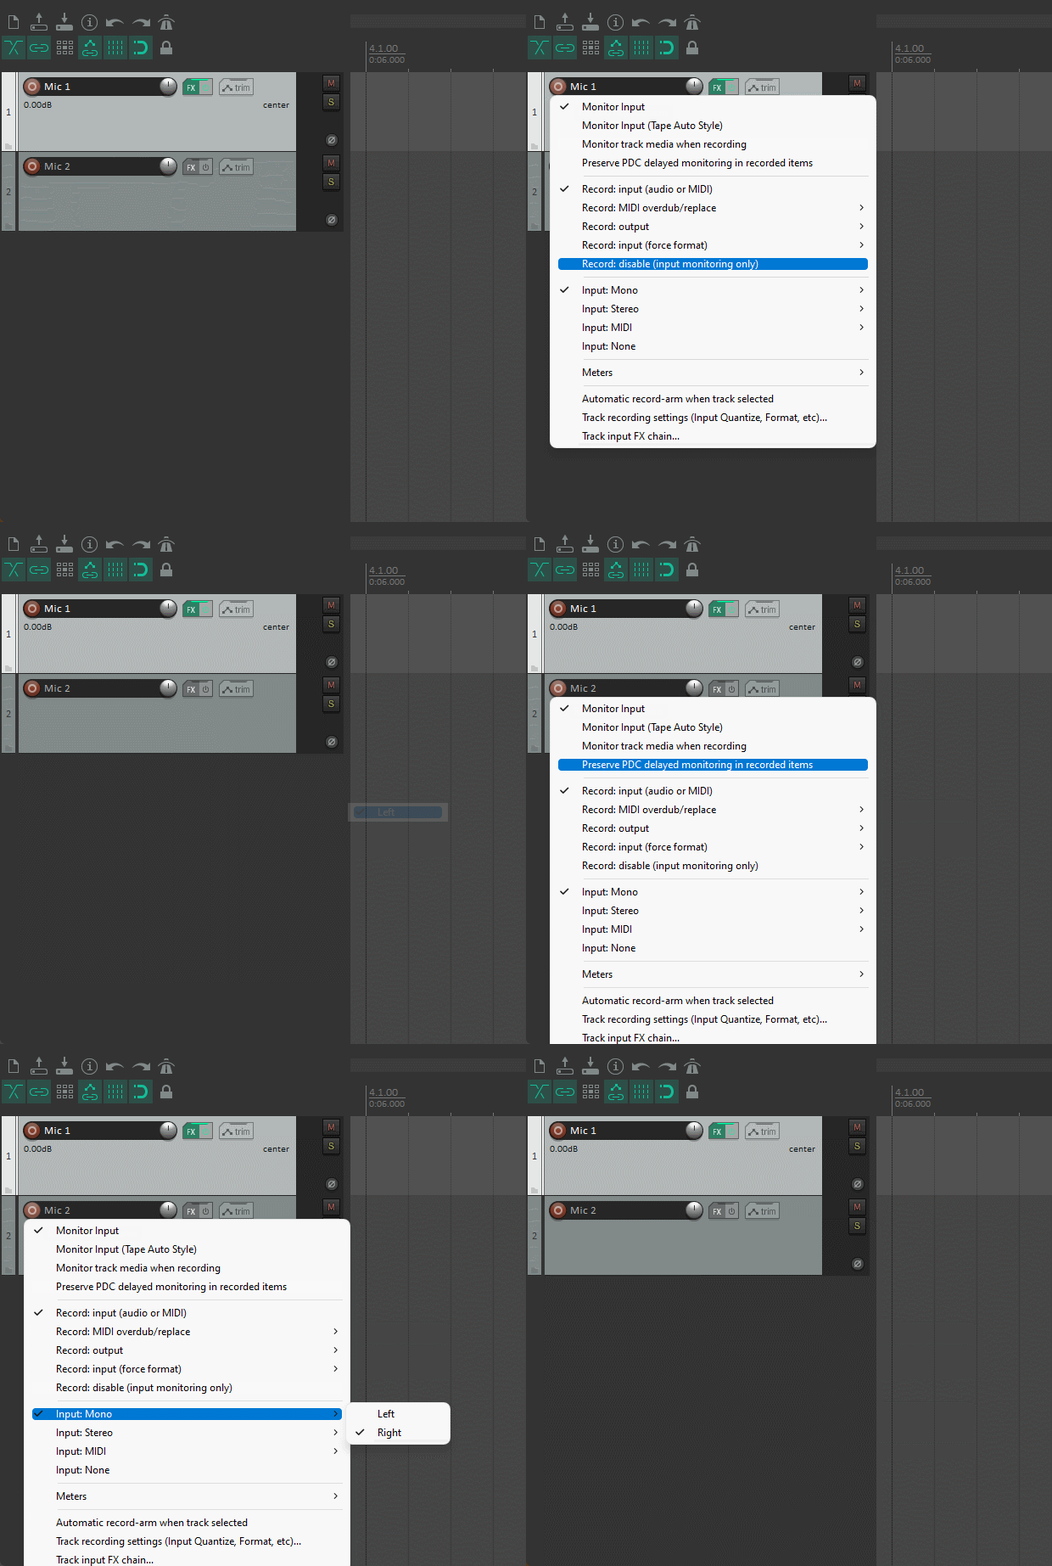
Assigning the left and right channels to the vocal tracks
Now you have both mics set up.
Setup your music and sound FX
Naturally you’ll go to our Smartsound Cloud site first and find some great music you can use for this. Select from Latin, to jazz or Irish, or whatever sets the proper mood for your podcast. Remember you can change the length of the track, so if you want an extended theme for opening, and then a shorter one for returning from a break, it’s super easy. Download the track and have it readily available. Also, if you want any additional sound effects, check out our FX section and you can find transition sounds, sweeps, boings, and whatever you need.
Now that you have your sounds ready, let’s make sure your MIDI instrument is enabled. Go to the “Options” menu, then look down to “Preferences”. The REAPER Preferences menu will pop up. Find “MIDI Devices” and look at the top box displayed. It’ll show you what’s plugged into your computer. You can use a keyboard, a drum pad, or whatever MIDI instrument you have. Make sure it says “Enabled” next to that instrument. Double click on “Enabled” and make sure “Enable input for this device” and “Enable input for control messages” are both checked.
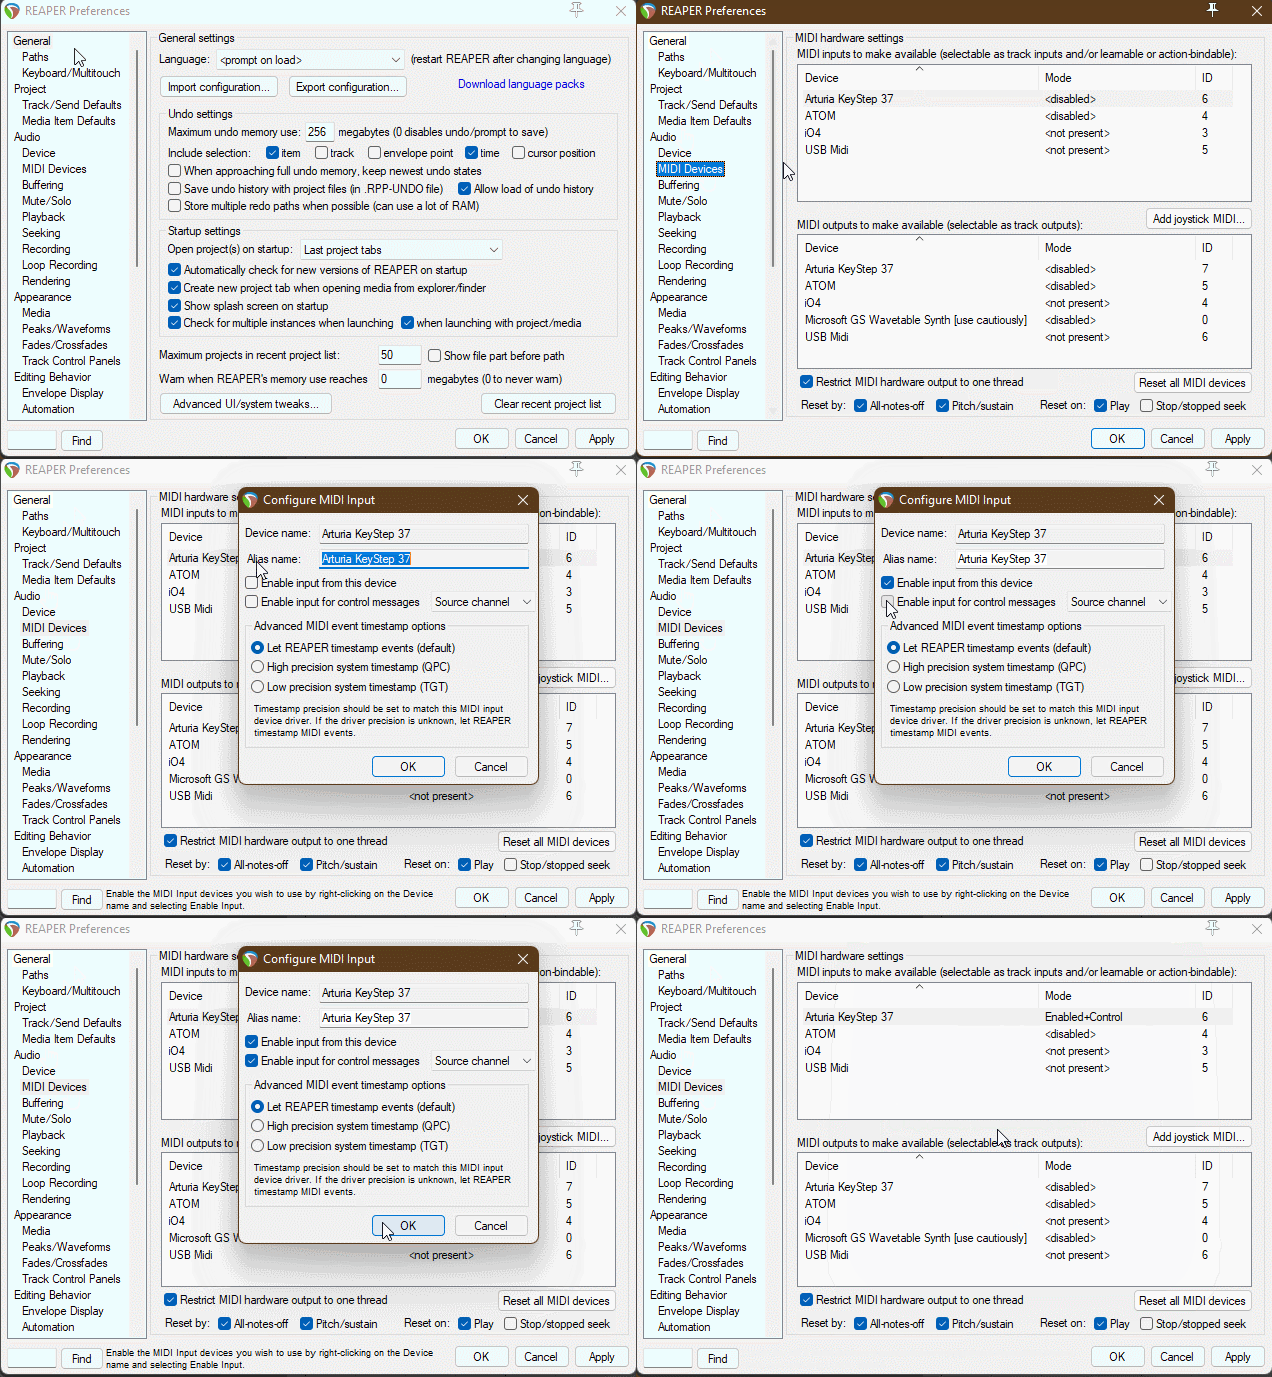
Setting up MIDI in Reaper
If you don’t have a physical MIDI instrument, don’t worry. Reaper lets you setup a virtual one. Just press “View” then “Virtual MIDI keyboard” and voila. You can also use your actual keyboard to control the virtual keyboard, with each letter being displayed on each key as you see.
Create a new track by pressing CTRL+t or click “Insert” on the blank space on the left and then “Track”. Give the track a name by double clicking on the blank part. Here we can name it “Sounds”. Then setup the MIDI track. Click on the dark red button with a circle on it to the left of the name. Then on the button next to “IN FX” left click, go down to “Input:MIDI”, find your instrument and select it, and then select “All channels” (if you’re using a virtual keyboard, simply go to “Input:MIDI”, “Virtual MIDI Keyboard” then “All channels”.
While you have this track armed, test your MIDI device by pressing a key. A bar should pop up at the volume meter every time you hit it. This shows it’s receiving a signal and it’s good to go.
We’re not quite done, we’ll now need to assign those keys to sounds.
Click on the “FX” button. Look under “All Plugins” and find “Cockos” (it comes with Reaper). Select that. Then find “VSTi:ReaSamplOmatic5000 (Cockos)” (you can also find a different sampler VST and use that if you have one). Go to View, choose “Media Explorer” and navigate to where you’ve put your media files from Smartsound Cloud (or anywhere else). Drag your first track into the white space on ReaSamplOmatic. Then select your note on “NoteStart” (I like to start out at C3 or 48) and select the same note for “NoteEnd”.
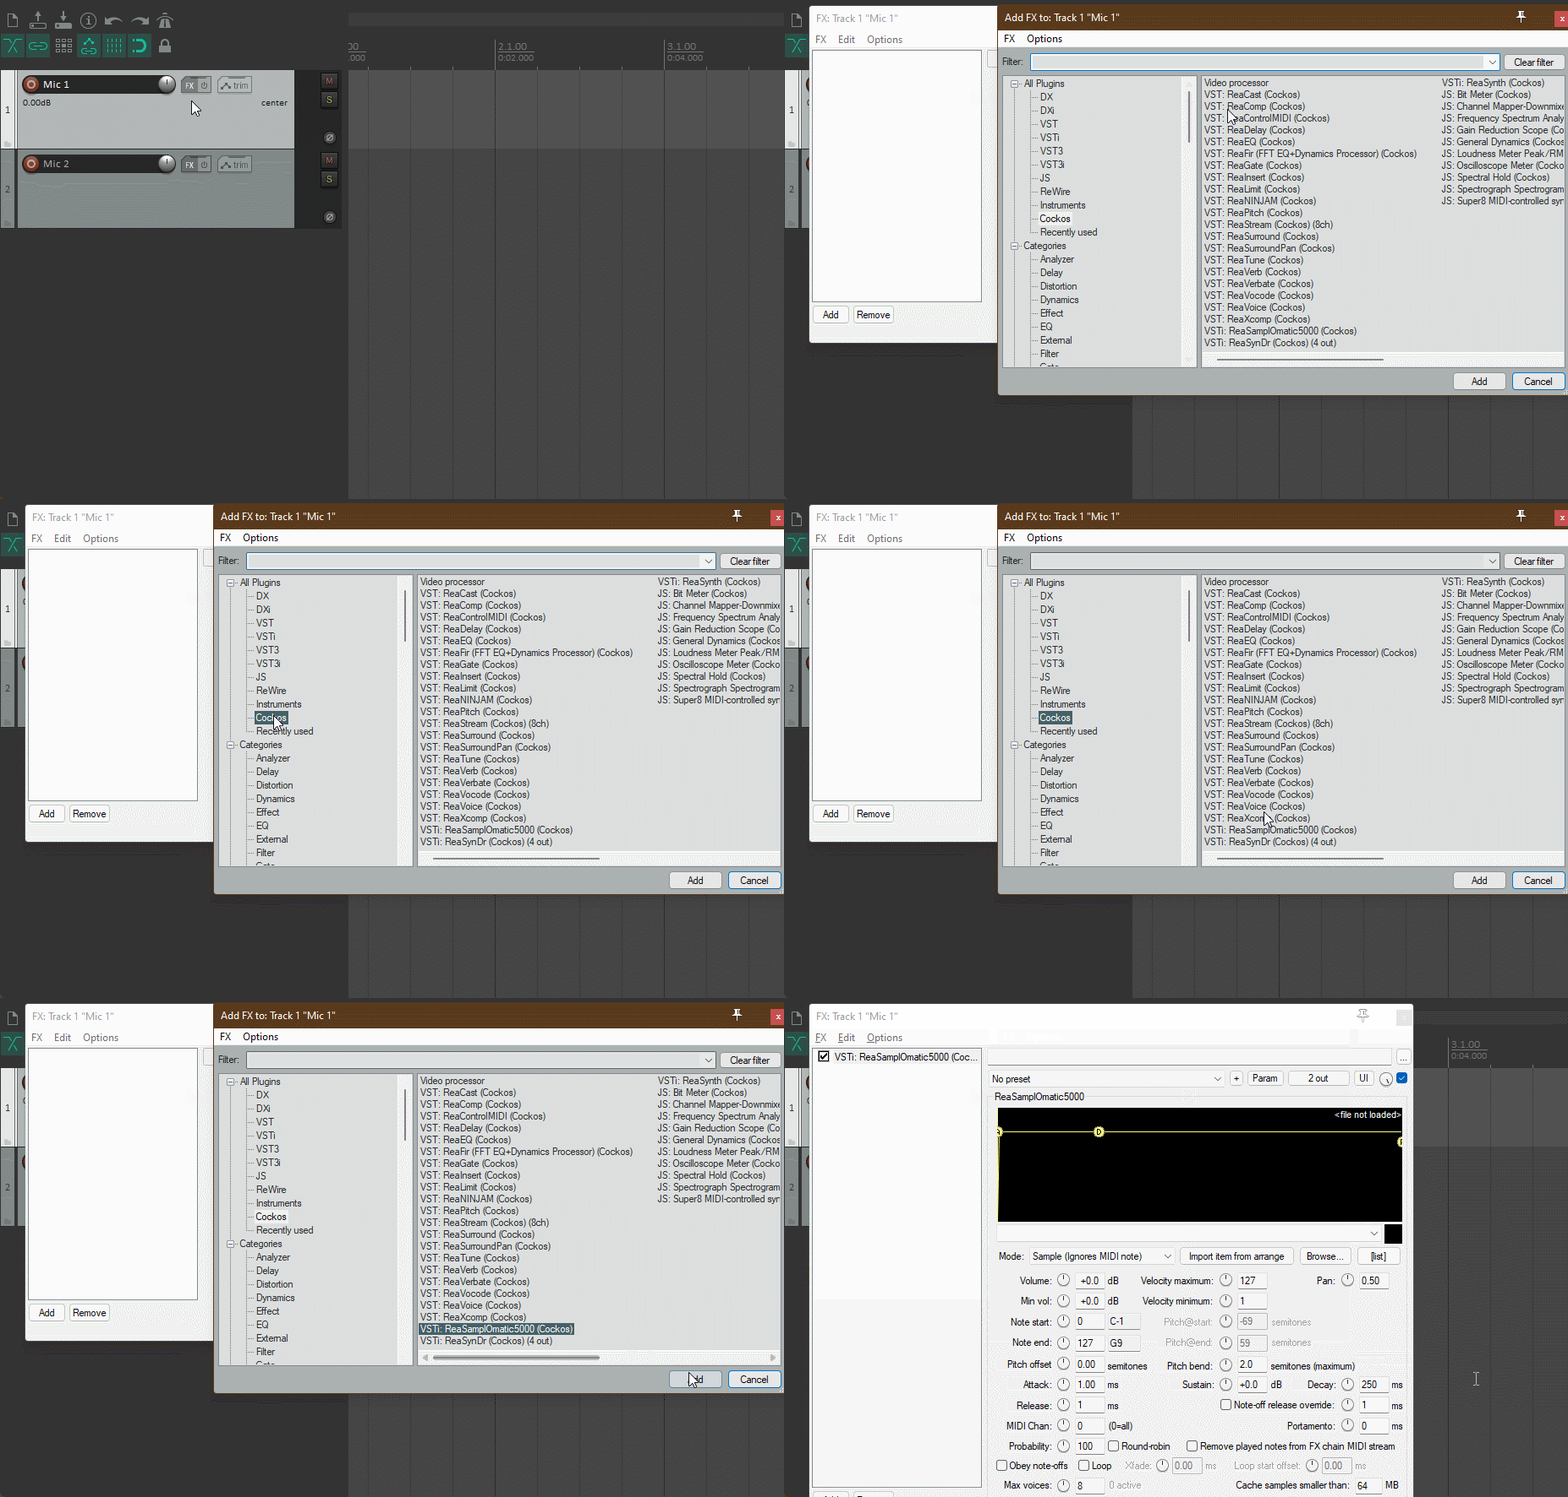
Go to the FX list on the left. Click “Copy FX” and then “Paste FX”. Now in this instance, you’ll put in your next piece of music or sound FX. Select a different note (like 50, which is D3). Notice also where the WAV is displayed; you can use your mouse to edit the length of the sound and also the attack (how fast it comes to full volume) and decay (how fast it goes to silence).
Now let’s say your MIDI controller has some knobs and you want to control the volume of the music to fade it in or out. This is easy too. Make sure you’ve selected the sound you want from your list on the left. Then from ReaSamplOmatic, click on “volume” (or any other effect you’d like to control with the knob). Then “param”, followed by “learn”, then turn the knob and voila.
Press the red “X” at the top right when you’re done assigning all your music and FX.
Save as preset
Now, don’t record yet! Make sure that you save this as a preset, so that you can open this up and have it ready to go every time you want to podcast. With just a few clicks of the mouse, you’ll be ready to go in no time every time.
Go to “File”, “Project Templates”, and then “Save project as a template”. Name it as you like: “[Your podcast name] setup”. When you’re ready to record a new episode, you can then open Reaper, click on “Project Templates” and you’ll find this template ready to go right there.
And there you have it, a very basic podcast setup in Reaper. In a later blog, I’ll go through the best effects chain to set up (which will be good for any DAW) to make your voice nice and crisp.
Make sure to not miss a blog: Sign up on our mailing list. You can also subscribe to us and stay up to date on our Facebook, Instagram, and Twitter. Be sure to tag us if you use our music in one of your projects and we’ll check it out and share. Cast on!
